# ทำแอปหลายภาษาง่ายติ้ดดดเดียว
#Dev#Flutter#Flutter 2#Localization#Vscode#I18n Allyสำหรับใครที่ต้องการจะทำแอปให้รองรับหลายภาษา สามารถอ่านบทความนี้แล้วทำตามกันได้เลยครับ จริงๆเรื่องนี้ก็เคยเขียนมาแล้วที่บทความ นี้
โดยตัวที่ผมจะใช้นั้นมีชื่อว่า easy_localization (opens new window) ซึ่งตอนนี้เป็น Version 3.0.0 แล้ว มีการปรับเปลี่ยนการใช้งานให้ง่ายขึ้นกว่าเดิมเข้าไปอีกมากมาย

# สร้างโปรเจค
สร้างโปรเจคเลยครับแล้วก็นี่คือโค้ดเริ่มต้นของผม
และเมื่อเราเปิดดูไฟล์ lib/main.dart เราก็จะเห็น (ก็โค้ดเริ่มต้นนั่นล่ะ ข้ามๆไปได้)
import 'package:flutter/material.dart';
void main() {
runApp(MyApp());
}
class MyApp extends StatelessWidget {
Widget build(BuildContext context) {
return MaterialApp(
title: 'Flutter Demo',
theme: ThemeData(
primarySwatch: Colors.blue,
),
home: MyHomePage(title: 'Flutter Demo Home Page'),
);
}
}
class MyHomePage extends StatefulWidget {
MyHomePage({Key key, this.title}) : super(key: key);
final String title;
_MyHomePageState createState() => _MyHomePageState();
}
class _MyHomePageState extends State<MyHomePage> {
int _counter = 0;
void _incrementCounter() {
setState(() {
_counter++;
});
}
Widget build(BuildContext context) {
return Scaffold(
appBar: AppBar(
title: Text(widget.title),
),
body: Center(
child: Column(
mainAxisAlignment: MainAxisAlignment.center,
children: <Widget>[
Text(
'You have pushed the button this many times:',
),
Text(
'$_counter',
style: Theme.of(context).textTheme.headline4,
),
],
),
),
floatingActionButton: FloatingActionButton(
onPressed: _incrementCounter,
tooltip: 'Increment',
child: Icon(Icons.add),
),
);
}
}
Note
ซึ่งตอนที่เขียนบทความนี้ Flutter พึ่งเปิดตัว Null-Safety ในภาษา Dart เราก็จะเริ่มใช้กันเลย
# เริ่มใช้ Null-Safety
เราสามารถใช้ Migrate Tools ที่ทาง Dart ทำมาให้ได้เลยโดยใช้คำสั่ง
dart migrate --apply-changes
# เริ่ม Setup กันเลยครับ
# เพิ่ม Dependencies
ทำการติดตั้ง easy_localization (opens new window)
โดยเราจะต้องเพิ่ม dependencies ที่ไฟล์ pubspec.yaml ดังนี้
...
dependencies:
  flutter:
    sdk: flutter

  # The following adds the Cupertino Icons font to your application.
  # Use with the CupertinoIcons class for iOS style icons.
  cupertino_icons: ^0.1.2

  easy_localization: ^3.0.0
...
ต่อไปเราจะทำการเพิ่มโฟลเดอร์ assets หรือไฟล์คำแปลของเรา ให้ตัว Flutter รู้ว่าจะทำการใช้ไฟล์ไหนบ้าง โดยการเลื่อนไปข้างล่างของไฟล์ pubspec.yaml
...
flutter:
  ...
  assets:
    - assets/lang/
...
จากนั้นก็รัน
flutter pub get
# หน้าแอปและส่วนที่เราจะทำการแปลภาษา

# เพิ่มไฟล์ภาษาต่างๆ
จากนั้นให้ทำการเพิ่มไฟล์ภาษาในรูปแบบ assets/lang/{langCode}-{countryCode}.json เช่น assets/lang/en-US.json
หรือจะไม่ใส่ country code ก็ได้ assets/lang/{langCode}.json เช่น assets/lang/en.json
ไฟล์ภาษาอังกฤษ assets/lang/en.json
{
  "app": {
    "title": "Multi locale clicker",
    "changeLang": "เปลี่ยนภาษา",
    "description": "You have pushed the button this many times",
    "increment": "Increment",
    "counter": {
      "zero": "{} times",
      "one": "{} time",
      "two": "{} times",
      "other": "{} times"
    }
  }
}
ไฟล์ภาษาไทย assets/lang/th.json
{
  "app": {
    "title": "Multi locale clicker",
    "changeLang": "Change language",
    "description": "คลิกสิคลิกหลายๆที",
    "increment": "เพิ่ม",
    "counter": {
      "zero": "{} ครั้ง",
      "one": "{} ครั้ง",
      "two": "{} ครั้ง",
      "other": "{} ครั้ง"
    }
  }
}
Note
app.changeLang จะใช้กับปุ่มเปลี่ยนภาษา
counter ตั้งใจทำไว้เพื่อรองรับ Plural ในภาษาอังกฤษ
# ตั้งค่า easy_localization ลงในแอป
หลายขั้นตอนค่อยๆทำไปครับ โดยเราจะทำการแก้ไฟล์ lib/main.dart กัน
import 'package:flutter/material.dart';
import 'package:easy_localization/easy_localization.dart';

void main() async {
  WidgetsFlutterBinding.ensureInitialized();
  await EasyLocalization.ensureInitialized();

  runApp(
    EasyLocalization(
      supportedLocales: [Locale('en'), Locale('th')],
      path: 'assets/lang',
      fallbackLocale: Locale('th'),
      child: MyApp(),
    ),
  );
}

class MyApp extends StatelessWidget {
...
สิ่งที่เราทำก็คือเพิ่ม Widget EasyLocalization มาก่อน Widget MyApp
โดยเจ้า EasyLocalization จะเป็นตัวหลักในการตั้งค่า Locale ต่างๆ
ทีนี้ก็ทำการเพิ่ม Localization ให้กับ MaterialApp (หรือ CupertinoApp)
...
class MyApp extends StatelessWidget {
Widget build(BuildContext context) {
return MaterialApp(
localizationsDelegates: context.localizationDelegates,
supportedLocales: context.supportedLocales,
locale: context.locale,
title: 'Flutter Demo',
theme: ThemeData(
primarySwatch: Colors.blue,
),
home: MyHomePage(title: 'Flutter Demo Home Page'),
);
}
}
...
EasyLocalization จะเป็นตัวที่กำหนด context.localizationDelegates context.supportedLocales context.locale ให้เราเอามาใช้ได้
ก็เป็นอันเรียบร้อย ทีนี้มาเริ่มแปลภาษากันครับ โดยการใช้คำสั่ง tr('...'), '...'.tr() หรือ Text('...').tr()
...
return MaterialApp(
  ...
  home: Builder(
    builder: (context) {
      return MyHomePage(
        title: tr('app.title'),
      );
    },
  ),
);
...
Note
เพราะฟังก์ชั่น Localization ถูกสร้างที่ Widget MaterialApp ถ้าอยากจะเรียกใช้การแปลภาษาที่ MaterialApp ผมต้องซ้อนผ่าน Widget Builder ก่อน
แปลในส่วนของหน้าหลักกันต่อ
...
return Scaffold(
  appBar: AppBar(
    title: Text(widget.title!),
  ),
  body: Center(
    child: Column(
      mainAxisAlignment: MainAxisAlignment.center,
      children: <Widget>[
        Text('app.description').tr(),
        Text(
          'counter',
          style: Theme.of(context).textTheme.headline4,
        ).plural(_counter),
      ],
    ),
  ),
  floatingActionButton: FloatingActionButton(
    onPressed: _incrementCounter,
    tooltip: tr('Increment'),
    child: Icon(Icons.add),
  ),
);
...
เมื่อรันแอปขึ้นมาก็จะเจอกับแอปในรูปแบบนี้ครับ

# เขียนส่วนตั้งค่าเปลี่ยนภาษา
เนื่องด้วย Library ตัวนี้เขียนไว้ให้จำภาษาแรกไว้ (คือเปลี่ยนภาษาเครื่องเป็นภาษาอื่นก็จะไม่มีการเปลี่ยนตาม) ถ้าเราต้องการเปลี่ยนภาษาเราอาจจะต้องเขียนส่วนของการตั้งค่าเพิ่มเอง
...
return Scaffold(
  appBar: AppBar(
    title: Text(widget.title),
    actions: <Widget>[
      Padding(
        padding: const EdgeInsets.symmetric(horizontal: 10.0),
        child: TextButton(
          child: Text(
            tr('app.changeLang'),
            style: TextStyle(color: Colors.white),
          ),
          onPressed: () => setState(() {
            if (context.locale.languageCode == 'en') {
              context.setLocale(Locale('th'));
            } else {
              context.setLocale(Locale('en'));
            }
          }),
        ),
      )
    ],
  ),
...
ทีนี้ลองกดปุ่ม เปลี่ยนภาษา ดู

Note
แม้จะปิดแอปเปิดใหม่ ภาษาที่เราเปลี่ยนก็จะยังคงอยู่
เพราะ Library นี้มีการบันทึกค่าภาษาลงใน Shared Preferences
# Bonus
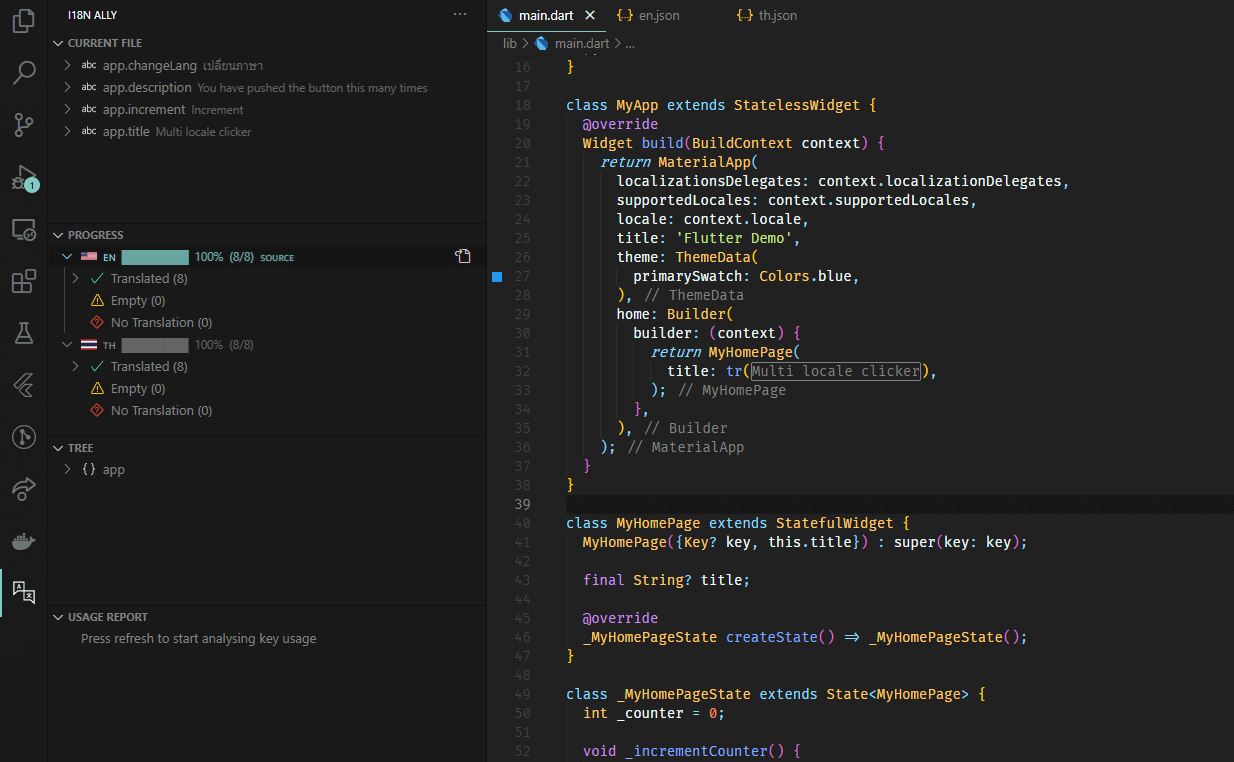
มี Plugins แนะนำสำหรับใช้ในการจัดการ Localization บน VSCode ที่ชื่อ i18n Ally (opens new window)
# ตั้งค่าเพื่อใช้กับ Easy Localization
- กด Ctrl+Shift+P (Command+Shift+P บน MacOS) และเลือก i18n Ally: Auto-detect locales path
- เพิ่มไฟล์
.vscode/i18n-ally-custom-framework.yml
# .vscode/i18n-ally-custom-framework.yml

# An array of strings which contain Language Ids defined by VS Code
# You can check avaliable language ids here: https://code.visualstudio.com/docs/languages/overview#_language-id
languageIds:
  - dart

# An array of RegExes to find the key usage. **The key should be captured in the first match group**.
# You should unescape RegEx strings in order to fit in the YAML file
# To help with this, you can use https://www.freeformatter.com/json-escape.html
usageMatchRegex:
  # The following example shows how to detect `t("your.i18n.keys")`
  # the `{key}` will be placed by a proper keypath matching regex,
  # you can ignore it and use your own matching rules as well
  - "Text\\(\\s*['\"`]({key})['\"`][\\s\\w:,\\(\\)]*\\)\\.tr\\("
  - "['\"`]({key})['\"`]\\.tr\\("
  - "[^\\w\\d]tr\\(['\"`]({key})['\"`]"


# An array of strings containing refactor templates.
# The "$1" will be replaced by the keypath specified.
# Optional: uncomment the following two lines to use

# refactorTemplates:
#  - i18n.get("$1")


# If set to true, only enables this custom framework (will disable all built-in frameworks)
monopoly: true
ทีนี้ VSCode ก็จะช่วยเราดูได้แล้วว่ามีอะไรที่เราแปลไม่ครบบ้าง
ดาวน์โหลด Source Code ที่นี่ (opens new window)